Illustrating A Dragon In Procreate - Full Process - Episode 14
video - Episode 14
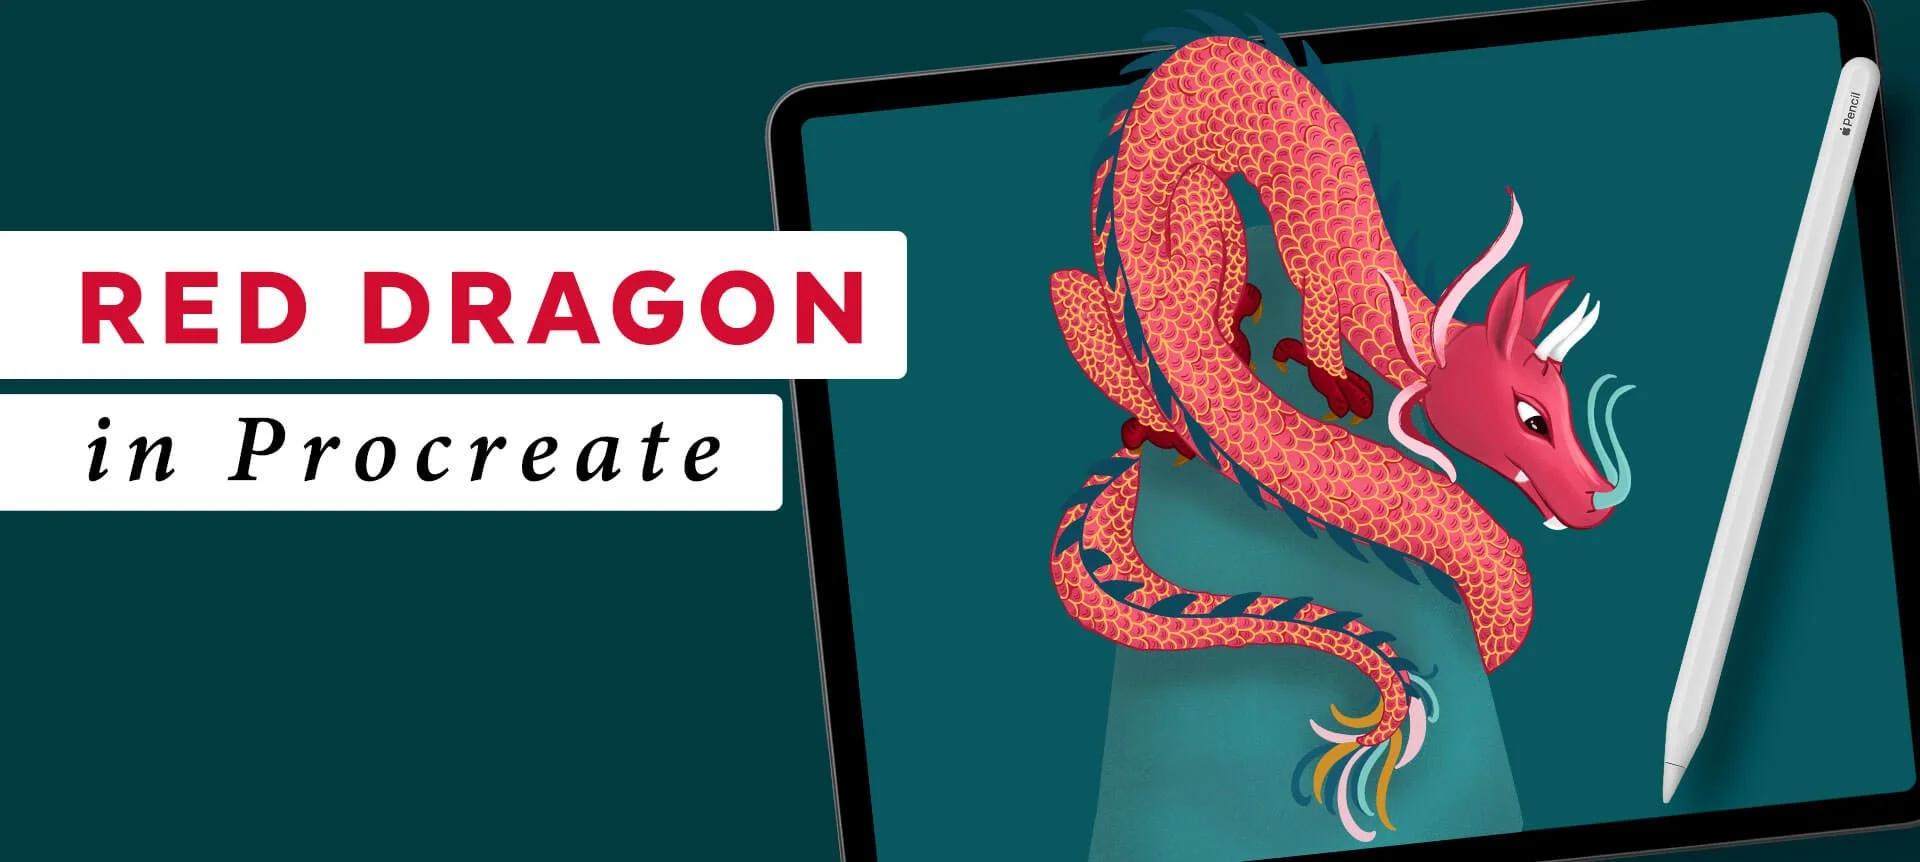
Today is another complete process timelapse episode, and I am creating a red dragon in Procreate on the iPad.
Planning out your drawings in advance makes creating your illustrations way easier. For this red dragon, I began my dragon sketch using my layered sketching process, but for this one, I had to decide on how to make the dragon scales that would wrap around his body.
To create the dragon scales that curve around and move with his body, I designed a mesh guide before sketching the scales to help me plan out his scales in advance. The mesh is only lines that determine the curvatures across the body and guide the direction of the scales.
How To Illustrate A Red Dragon In Procreate
I used darker color linework to define the edges of the dragon's body and bright, bold colors to create the body colors and scales.
To learn more about how to use a layered sketching process like I do in this video, you can grab my sketching guide below!
Learn How To Sketch In Layers In Procreate
Get the sketching guide and learn a powerful sketching process that will transform your drawing skills.
How To Illustrate A Red Dragon In Procreate Transcript:
-
00:00:01.135 --> 00:00:05.775
I am Denise Palmer and I am an illustrator artist and surface pattern designer
00:00:06.085 --> 00:00:10.735
working out of my studio close to the Gulf of Mexico where water
00:00:10.735 --> 00:00:13.975
adventures and botanical plants surround my everyday life.
00:00:14.565 --> 00:00:18.535
Welcome to these video chats where I talk about some of the techniques I've used
00:00:18.535 --> 00:00:23.375
to create my artwork and chat about all things illustration, art, and design.
00:00:24.115 --> 00:00:29.015
I'm starting out this video with the evolution of my sketches because I did one
00:00:29.015 --> 00:00:33.175
thing different that made a big impact in how I created this dragon.
00:00:33.535 --> 00:00:36.215
I turned off the rough sketch and this is the refined sketch,
00:00:36.275 --> 00:00:40.335
but I'm gonna turn the opacity on the layer up so you can see it better. I put the
00:00:40.335 --> 00:00:43.975
shadows on a separate layer, and before I sketched the dragon scales,
00:00:44.175 --> 00:00:48.775
I created a mesh guide to help me think about where the scales needed to go to
00:00:48.775 --> 00:00:50.215
wrap around the dragon's body.
00:00:50.365 --> 00:00:54.575
This mesh was extremely helpful in creating the scales and positioning them.
00:00:54.575 --> 00:00:55.495
To create the scales,
00:00:55.535 --> 00:00:59.815
I really had to think about how the inside of the dragon's body moves and how
00:00:59.835 --> 00:01:03.335
his skin would wrap around the inside structure of his skeleton.
00:01:03.715 --> 00:01:07.655
It was also the first time I had to create scales on a dragon and it was way
00:01:07.655 --> 00:01:09.495
more challenging than I thought it was going to be.
00:01:10.095 --> 00:01:13.055
I learned so much from having to create the dragons for this project,
00:01:13.385 --> 00:01:16.375
especially because of the complexity of the scales.
00:01:16.675 --> 00:01:20.415
Now I'm turning on the sketch of the scales, which I did on its own layer.
00:01:20.915 --> 00:01:24.455
You can see that the scales follow the shape and size of the mesh areas,
00:01:24.755 --> 00:01:28.695
but do not exactly stay in the diamond shapes the mesh creates.
00:01:29.315 --> 00:01:30.855
The mesh is just a guide.
00:01:30.995 --> 00:01:35.535
But this helped me see where the scales needed to turn and become smaller in the
00:01:35.535 --> 00:01:37.775
overall skin layer of his body.
00:01:37.885 --> 00:01:40.695
This is one of three dragons I created for this project,
00:01:41.035 --> 00:01:45.615
and I'd never drawn this type of dragon before and never had I done dragon
00:01:45.715 --> 00:01:46.548
scales either.
00:01:46.835 --> 00:01:49.855
So don't be afraid to draw something new because you have never done it.
00:01:49.925 --> 00:01:52.095
It's important to think about your approach though,
00:01:52.235 --> 00:01:56.935
and this is how I approached drawing my dragons by using the mesh
00:01:57.045 --> 00:01:58.255
that I wanted to share with you.
00:01:58.675 --> 00:02:03.175
Now as I am blocking in the color and procreate underneath the sketch layer,
00:02:03.635 --> 00:02:07.855
I'm using my monoline brush to create the shape I'm going to fill with the same
00:02:07.905 --> 00:02:10.575
color. I'm not thinking about shadows.
00:02:10.715 --> 00:02:15.215
I'm just filling in the main body color for this red dragon and following along
00:02:15.215 --> 00:02:19.455
the sketch lines I've already created for his tail that is wrapped around the
00:02:19.535 --> 00:02:24.015
mountain, I'm color blocking this color in still on the same layer.
00:02:24.365 --> 00:02:29.175
This is one of my favorite details of this dragon is how his tail and body just
00:02:29.345 --> 00:02:32.095
wraps around this mountain. When I imagined him,
00:02:32.775 --> 00:02:35.135
I was thinking about him coming out of the water,
00:02:35.325 --> 00:02:40.135
this huge dragon and climbing on top of this mountain to look over the land,
00:02:40.755 --> 00:02:45.495
but this dragon circled around the mountain with his huge long body to get a
00:02:45.495 --> 00:02:49.055
nice vantage point. Going to be looking over at something below,
00:02:49.475 --> 00:02:53.095
and I will show you the whole scene at the end of this video so you can see it
00:02:53.095 --> 00:02:56.285
all put together. Once I had the shadows in place,
00:02:56.605 --> 00:02:58.085
I wanted to get the scales done.
00:02:58.585 --> 00:03:02.645
The shadows helped me visualize the curves of the body as I was working on
00:03:02.705 --> 00:03:05.085
scales, so it was good to get those in place.
00:03:05.695 --> 00:03:09.325
Since I spent a lot of the time on my sketch for the scales,
00:03:09.525 --> 00:03:12.725
I followed pretty closely to the sketch for working on them.
00:03:13.045 --> 00:03:18.045
I kept the scale line work simple and used my monoline brush to create them as I
00:03:18.045 --> 00:03:21.325
worked around his entire body where the scales needed to be.
00:03:23.085 --> 00:03:27.375
Then I went back and turned off my sketch layer so I could really see what I was
00:03:27.375 --> 00:03:28.035
doing,
00:03:28.035 --> 00:03:33.015
and starting at his head I added textured lines to the scales and
00:03:33.015 --> 00:03:37.855
some darker red areas to create a sense of shadowing underneath some of
00:03:37.915 --> 00:03:41.475
his scales. This brush I was using here,
00:03:41.675 --> 00:03:43.475
I believe was the script brush,
00:03:43.735 --> 00:03:47.595
but I cannot be sure now since this was a past custom project,
00:03:48.095 --> 00:03:52.435
but any brush that has a like taper to it and is somewhat smooth
00:03:52.805 --> 00:03:55.325
would work.
00:03:55.525 --> 00:04:00.485
Next I added in the spike that curved along the back of his body and then added
00:04:00.685 --> 00:04:05.205
a line that connected the spikes together like a centered ridge along his
00:04:05.445 --> 00:04:05.945
backbone.
00:04:05.945 --> 00:04:10.565
Though this dragon would have to have a very flexible backbone in order to curve
00:04:10.565 --> 00:04:14.125
around the way he has around the mountaintop.
00:04:17.095 --> 00:04:21.775
I wanted to give him some softer edges to his body since his coloring is bright
00:04:21.875 --> 00:04:22.708
and bold,
00:04:22.875 --> 00:04:27.055
so I used a darker red to add some edge line work to his body.
00:04:27.565 --> 00:04:32.375
This helped to define the creases where his legs touched together and break up
00:04:32.375 --> 00:04:36.855
the body part boundaries. Once I had the main details done,
00:04:37.135 --> 00:04:39.655
I started finishing, finishing up the face details,
00:04:39.685 --> 00:04:42.695
including his fangs eyes and horns.
00:04:44.775 --> 00:04:49.335
I also added his claws in a golden color that worked nicely with his red body.
00:04:49.995 --> 00:04:53.615
It is so nice to have a detailed sketch to work from because you never need to
00:04:53.615 --> 00:04:57.935
guess where and what to do next. It is all there for you.
00:04:58.325 --> 00:05:03.135
Your map and details to your illustration all planned out in
00:05:03.135 --> 00:05:03.968
advance.
00:05:04.785 --> 00:05:09.085
I'm almost done with this guy and adding the last details that really bring him
00:05:09.285 --> 00:05:13.645
together the way I envisioned. He has colorful details around his face,
00:05:14.075 --> 00:05:17.085
nose, and tail that I added at this point.
00:05:18.425 --> 00:05:23.405
I'm adding some darker lime work around his eye to really add some separation
00:05:23.405 --> 00:05:28.205
there. I'm also adding some color details around his tail,
00:05:29.025 --> 00:05:32.845
and I liked having multiple colors on his tail
00:05:33.835 --> 00:05:38.445
because the mountain is a big part of his positioning as he's wrapping around
00:05:38.445 --> 00:05:39.125
it.
00:05:39.125 --> 00:05:43.725
I also finished up the details of the mountain as part of this illustration
00:05:43.725 --> 00:05:44.425
piece.
00:05:44.425 --> 00:05:48.045
Dragon and the mountain are part of several illustrations that were put together
00:05:48.105 --> 00:05:49.285
to make the finished artwork.
00:05:49.915 --> 00:05:54.605
Here is the finished illustration of the Red dragon all put together
00:05:54.705 --> 00:05:59.205
in his surroundings, and I titled this Design Dragonland Mountains.
00:06:00.045 --> 00:06:04.665
It is the story of these protective creatures rising up from the
00:06:05.075 --> 00:06:09.185
ocean waters to look over their people and bring them
00:06:09.555 --> 00:06:12.105
protection and prosperity to all of them.
00:06:13.945 --> 00:06:16.985
I will be sharing more process videos just like this one,
00:06:17.285 --> 00:06:21.225
so be sure to subscribe. Thank you for watching!